Surely you've heard the expression, “a chain is only as strong as its weakest link.” Polyvinyl Chloride is an impressively strong and rigid material that’s great for handling liquid media, but any PVC infrastructure you create is only as strong as its weakest link. In the case of piping, that means your joints.
Properly cemented PVC joints are incredibly strong, and will stay watertight for years. The cementing process is not overly complicated or difficult, but it does require some thought and attention to detail. Below we’ll explain step-by-step how to properly prep and join PVC pipe and fittings.
Preparing the Pipe:
For a strong joint, it’s important to have a clean, straight cut on your pipe. We recommend using a PVC cutter tool made especially for pipe, or a saw that will not leave a rough, gummed up edge on the pipe. Once your cut is made, use a file to remove all burs and create a smooth edge.
Some users will tell you that a smooth edge is good enough, but we recommend using a file or bevel tool to create a small bevel on the outside edge of the pipe lip. This bevel is called a chamfer. A chamfer will help create a good fit and watertight seal inside your fitting. The next step of the prep stage is to remove all dirt, grease, and moisture from the surfaces that will be joined. Any contaminants will compromise the strength of the bond.
Before applying any primer or glue you will want to dry fit your joint. This just means fitting the parts together without glue. The pipe should go into the fitting easily at first and then become tighter as it is completely inserted. The joint shouldn't be so tight that you can’t fit the pipe into the socket completely.
If your job requires an exact angle or configuration, mark your joint during the dry fit to ensure parts are lined up properly during the cementing. Creating a straight line across the joint with a marker or pencil will allow you to replicate the dry fit position later.
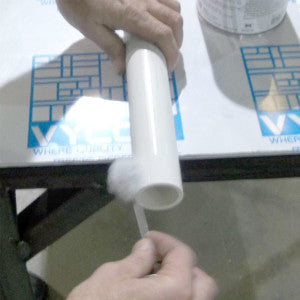
Priming your joint:
Gather all the materials you will need to complete the joint. Once you begin priming, it is important to work quickly so that the primer and glue don’t have a chance to dry up. The wet chemical reaction is what softens the PVC and allows it to form a strong bond.
Use a primer applicator (equal to about half the pipe diameter in size) to generously apply your PVC primer to the inside of the fitting socket. Be sure the socket is completely coated, but that there are no puddles in the socket.
Next, apply the primer to the outside of the pipe end. Again, apply generously without leaving any dry areas. The primer should be applied a half inch beyond the depth of the socket. When this is done, apply another layer of primer to the inside of the fitting socket and move quickly to begin applying cement.
Cementing:
Make sure your cement is stirred well, and within its recommended use date. Use a proper cement applicator swab and begin working an even layer of cement onto the pipe. Don’t glop the cement on, but make sure it is thick enough that it won’t dry within the next few minutes. Do the same for the inside socket, and then give the pipe end one more layer. Do not wait for these to dry – immediately assemble the pipe and fitting.
Use a good amount of force and give the pipe a ¼ turn to distribute the cement and help the pipe reach the end of the socket. Hold the joint in place for at least 30 seconds while the cement sets. You should see a solid bead of cement around the complete circumference of the joint.
Use a rag to remove excess cement, being careful to not move or disturb the joint. To reach full strength the joint must cure for the recommended amount of time. See the chart below for approximate curing guidelines.
Average Time Schedule of PVC/CPVC Solvent Cement Cure
| Temperature Range (during assembly and cure period) | Pipe sizes½” to 1 ¼” | Pipe sizes1 ½” to 2” | Pipe sizes2 ½” to 8” | Pipe sizes10” to 15” | Pipe sizes15” + |
| 60 – 100 degrees F | 15 min (up to 160psi)6 hrs (160-370psi) | 30 min (up to 160psi)12 hrs (160-315psi) | 1 ½ hrs (up to 160 psi)24 hrs (160-315psi) | 48 hrs (up to 100psi) | 72 hrs (up to 100psi) |
| 40 – 60 degrees F | 20 min (up to 160psi)12 hrs (160-370psi) | 45 min (up to 160psi)24 hrs (160-315psi) | 4 hrs (up to 160 psi)48 hrs (160-315psi) | 96 hrs (up to 100psi) | 6 days (up to 100psi) |
| 0 – 40 degrees F | 30 min (up to 160psi)48 hrs (160-370psi) | 1 hr (up to 160psi)96 hrs (160-315psi) | 72 hrs (up to 160 psi)8 days (160-315psi) | 8 days (up to 100psi) | 14 days (up to 100psi) |
In humidity levels over 60% allow for at least 50% longer cure time. Chart is a general reference only. All times are approximate and may vary based on conditions.