Installing a French drain can be surprisingly easy, even for someone who doesn’t know what a French drain is. At its core, a French drain is a pipe surrounded by gravel buried under the ground to carry water from areas where it may cause damage if left alone to areas where it can be more easily drained. The basic process for installing a French drain is as follows:
- Determining placement
- Marking and digging your trench
- Adding materials and piping to the trench
- Concealing and camouflaging the drain.
Materials Needed for Installing a French Drain
- Shovel
- Top soil
- Sand
- Gravel
- Turf
- Landscape fabric
- Landscaping stones
- Striping spray paint
Drain pipe (lengths and materials will vary depending on whether you use black corrugated piping or white solid PVC piping—this post focuses on Schedule 40 PVC piping). Check out our other post to learn the difference between using corrugated piping and PVC piping for French Drains.
- Optional: Additional PVC fittings for easy clean-out (such as these). See notes below.
Steps for Installing a French Drain
- The first step of installing a French drain is to locate the area where the water will be re-routed to. Ideally, French drains will be installed in areas in a downward facing slope, approximately 1 meter away from any walls or fences without obstructions like trees or shrubs. Using spray paint, mark the path the French drain will make.
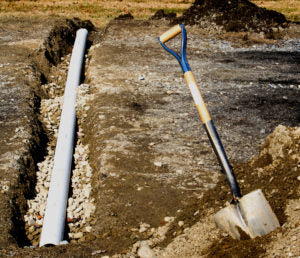
- Referring to your paint marks, use a shovel to dig a trench 6” wide. Trenches should run parallel to buildings and horizontally across slopes.
- Once your trench is dug, add approximately 3” of gravel along the bottom. Use landscaping fabric to line the trench, leaving 10” of fabric exposed on either side of the trench.
- Next, insert your PVC pipe into the trench on top of the fabric lining. Cover the pipe with gravel completely, leaving about 5” of space between the top of the gravel and the ground level. Fold the remaining landscaping fabric over the gravel to help protect the pipe.
- Using your shovel, fill the trench first with sand and then with topsoil. Cover that with turf and add a bed of stones around the open end of the pipe, and your French drain is installed!
Common Situations for Needing a French Drain
There are a number of different scenarios that may arise requiring the installation of a French drain, with certain situations being more common than others. For most, there are three possible scenarios that would require the installation of a French drain:
Surface Water
Surface water is a problem which commonly causes wet, soggy lawns or washed out driveways. If this is the source of your problems, a shallow French drain, also called a curtain drain, may be the answer. Curtain drains are designed to run horizontally across the lawn or driveway directly uphill from the area that requires drying out. The drain then channels water around the flooded or wet area. Curtain drains are typically on the shallow side, commonly only 2 feet deep and 1.5 feet across.
A Wet Basement
When it comes to taking care of drainage in a wet basement, you have a couple different options. First, you can install a deep French drain, or footing drain. This type of drain runs along the perimeter of your home and stops water before it can enter the basement. This type of drain is easy to install when building a home, but more difficult and costly to install in an already built home. In addition, if there is not enough of a slope for the drain to work on its own, you may have to pipe the water to a basin in the basement. From that basin, a sump pump will lift the water and send it through the drain system.

Another option for combating a wet basement is to install an interior French drain. This type of drain is often a better option than a footing drain, and intercepts water as it enters your basement. If you have a finished basement, the interior walls will have to be removed to install the system. Note, if there is water in your basement it is likely causing damage to the walls anyway. To install the system, a channel is cut around the perimeter of the basement floor, and piping is installed all the way around. The water flows into a tank under the floor, where a sump pump sends it out to a storm drain.
Retaining Wall on a Hill
If you happen to be building a retaining wall on a hillside, consider adding a French drain behind the first set of stones or blocks to help stop water building up behind the wall and undermining it. The ideal positioning for your drain is to have the pipe rest on the same base or footing that is supporting the wall. To stop the pipe from clogging, drape landscaping cloth over the pipe and gravel, then fold the cloth over the top of the gravel before adding soil to the top.
Things to Remember
When it comes to installing a French drain, there are a few things you must keep in mind.
Ensure you have a proper slope for drainage: For most French drains, a slope of about an inch every 8 feet is ideal. Without the correct slope, water will not move down the pipe and into the drainage system as it should.
Ensure the bedding you are using is correct: The bedding use around the French drain must be correct in order for the piping to be supported and the drain to work correctly.
Use a 45-degree angle joint at the end of your PVC pipe to help with easy cleanup: By attaching a 45 degree angle joint to the start of your piping and allowing a small amount of the pipe to stick out of the ground, you make cleaning out any debris much simpler.